Shadow
Centos8搭建LNMP环境
06/05
先新建一个软件目录,我们全部放在lnmp这个目录中
mkdir lnmp && cd lnmp下载Nginx
先去官方网站下载http://nginx.org/en/download.html,这里我们选择最新版下载 http://nginx.org/download/nginx-1.23.4.tar.gz
[root@centos8_1 lnmp]# wget http://nginx.org/download/nginx-1.23.4.tar.gz下载Mysql,这里我们使用Mysql8.0.33
下载地址:https://cdn.mysql.com/Downloads/MySQL-8.0/mysql-8.0.33-linux-glibc2.12-x86_64.tar.xz
[root@centos8_1 lnmp]# wget https://cdn.mysql.com/Downloads/MySQL-8.0/mysql-8.0.33-linux-glibc2.12-x86_64.tar.xz下载PHP7.4.33
下载地址:https://www.php.net/distributions/php-7.4.33.tar.gz
[root@centos8_1 lnmp]# wget https://www.php.net/distributions/php-7.4.33.tar.gz顺便提供下其他版本的PHP下载地址:
- PHP7.0.33 https://www.php.net/distributions/php-7.0.33.tar.gz
- PHP7.2.34 https://www.php.net/distributions/php-7.2.34.tar.gz
- PHP7.4.33 https://www.php.net/distributions/php-7.4.33.tar.gz
下载rpcsvc-proto
[root@centos8_1 lnmp]# wget https://www.linuxprobe.com/Software/rpcsvc-proto-1.4.tar.gz
系统要有具备编译程序源码的环境,把常用的软件包都给安装上
[root@centos8_1 lnmp]# dnf -y install apr* autoconf automake numactl bison bzip2-devel cpp curl-devel fontconfig-devel freetype-devel gcc gcc-c++ gd-devel gettext-devel kernel-headers keyutils-libs-devel krb5-devel libcom_err-devel libpng-devel libjpeg* libsepol-devel libselinux-devel libstdc++-devel libtool* libxml2-devel libXpm* libxml* libXaw-devel libXmu-devel libtiff* make openssl-devel patch pcre-devel perl php-common php-gd telnet zlib-devel libtirpc-devel gtk* ntpstat na* bison* lrzsz cmake ncurses-devel libzip-devel libxslt-devel gdbm-devel readline-devel gmp-devel
安装配置Nginx服务
创建用于管理网站服务的系统账户,新建账户时应使用-M参数不创建对应的家目录,-s参数指定登录后的Shell解释器为/sbin/nologin,确保任何人都不能通过这个账号登录主机。
[root@centos8_1 lnmp]# useradd nginx -M -s /sbin/nologin

编译安装Nginx网站服务程序。为了能够让网站服务支持更多的功能,需要在编译过程中添加额外的参数,其中较为重要的是使用prefix参数指定服务将被安装到哪个目录,方便后面找到和调用它。其次,考虑到HTTPS协议的使用越来越广泛,所以这里用with-http_ssl_module参数来开启Nginx服务的SSL加密模块,以便日后开启HTTPS协议功能:
[root@centos8_1 lnmp]# tar -zxvf nginx-1.24.0.tar.gz && cd nginx-1.24.0

编译
[root@centos8_1 lnmp]# ./configure --prefix=/usr/local/nginx --with-http_ssl_module 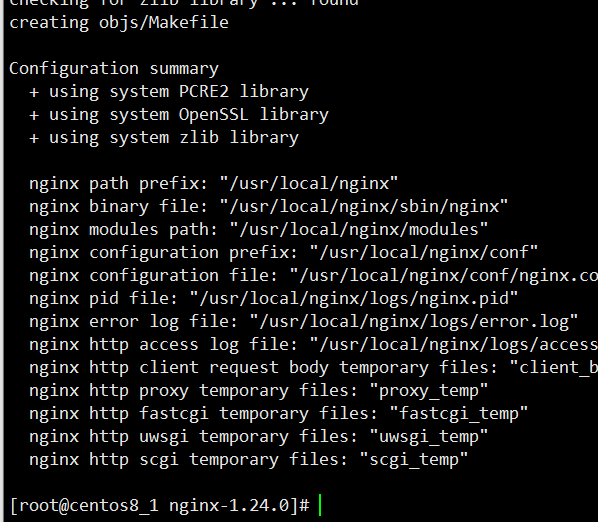
编译后安装
[root@centos8_1 lnmp]# make && make install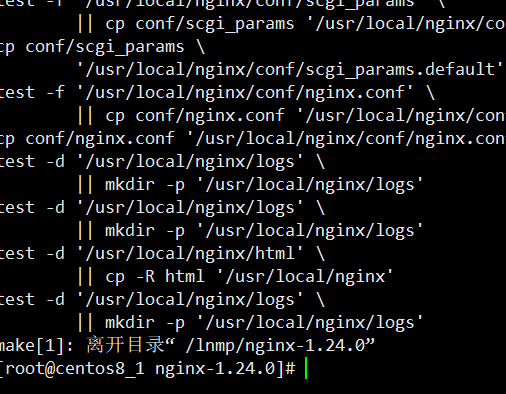
- 安装完毕后进入最终配置阶段,既然在编译环境中使用prefix参数指定了安装路径,在/usr/local/nginx目录
我们总共要进行3处修改,首先是把第2行的注释符(#)删除,然后在后面写上负责运行网站服务程序的账户名称和用户组名称。这里假设由nginx用户及nginx用户组负责管理网站服务。
[root@centos8_1 lnmp]# vim /usr/local/nginx/conf/nginx.conf
#下面是打开文件后的内容
  1
  2 user  nginx;
其次是修改第45行的首页文件名称,在里面添加index.php的名字。这个文件也是让用户浏览网站时第一眼看到的文件,也叫首页文件。
 43         location / {
 44             root   html;
 45             index  index.php index.html index.htm;
 46         }
最后再删除第65~71行前面的注释符(#)来启用虚拟主机功能,然后将第69行后面对应的网站根目录修改为$document_root,其中的fastcgi_script_name参数用于指代脚本名称,也就是用户请求的URL。只有信息填写正确了,才能使Nginx服务正确解析用户请求,否则访问的页面会提示“404 Not Found”的错误。
 65         location ~ \.php$ {
 66             root           html;
 67             fastcgi_pass   127.0.0.1:9000;
 68             fastcgi_index  index.php;
 69             fastcgi_param  SCRIPT_FILENAME  $document_root$fastcgi_script_name;
 70             include        fastcgi_params;
 71         }
通过编译源码方式安装的服务默认不能被systemctl命令所管理,而要使用Nginx服务本身的管理工具进行操作,相应命令所在的目录是/usr/local/nginx/sbin。由于使用绝对路径的形式输入命令未免会太麻烦,建议将/usr/local/nginx/sbin路径加入到PATH变量中,让Bash解释器在后续执行命令时自动搜索到它。然后在source命令后加载配置文件,让参数立即生效。下次就只需要输入nginx命令即可启动网站服务了。
[root@centos8_1 lnmp]# vim ~/.bash_profile
# .bash_profile

# Get the aliases and functions
if [ -f ~/.bashrc ]; then
    . ~/.bashrc
fi

# User specific environment and startup programs

PATH=$PATH:$HOME/bin:/usr/local/nginx/sbin

export PATH
[root@centos8_1 lnmp]# source ~/.bash_profile
[root@centos8_1 lnmp]# nginx
查看Nignx服务器是否启动,下面可以看到是成功启动了服务
root@centos8_1 lnmp]# ps aux|grep nginx
root        5238  0.0  0.1  42344   840 ?        Ss   23:04   0:00 nginx: master process nginx
nginx       5239  0.0  0.6  74464  4988 ?        S    23:04   0:00 nginx: worker process
root        5456  0.0  0.1  12348  1080 pts/0    S+   23:16   0:00 grep --color=auto nginx
并在浏览器中输入本机的IP地址,即可访问到Nginx网站服务程序的默认界面,如果访问不了,可能是防火墙打开了,关闭防火墙再试试
[root@centos8_1 lnmp]# systemctl stop firewalld安装配置Mysql服务
添加mysql用户,对于MySQL数据库来说,我们需要在系统中创建一个名为mysql的用户,专门用于负责运行MySQL数据库。请记得要把这类账户的Bash终端设置成nologin解释器,避免黑客通过该用户登录到服务器中,从而提高系统安全性。
[root@centos8_1 lnmp]# useradd mysql -M -s /sbin/nologin解压MySQL安装软件包。将解压出的程序目录改名并移动到/usr/local目录下,对其进行初始化操作后便可使用。需要注意的是,以.tar.xz结尾的压缩包软件,不应用z参数进行解压。
[root@centos8_1 lnmp]# tar xvf mysql-8.0.33-linux-glibc2.12-x86_64.tar.xz
[root@centos8_1 lnmp]# mv mysql-8.0.33-linux-glibc2.12-x86_64 /usr/local/mysql

在生产环境中管理MySQL数据库时,有两个比较常用的目录。一个是/usr/local/mysql目录,这是用于保存MySQL数据库程序文件的路径。还有一个是/usr/local/mysql/data目录,它用于存储数据库的具体内容,每个数据库的内容会被单独存放到一个目录内。对于存放实际数据库文件的data目录,用户需要先手动创建出来:
[root@centos8_1 lnmp]# cd /usr/local/mysql
[root@centos8_1 mysql]# mkdir data
初始化MySQL服务程序,对目录进行授权更改为mysql用户所属,保证数据能够被mysql系统用户读取。在初始化阶段,应使用mysqld命令确认管理MySQL数据库服务的用户名称、数据保存目录及编码信息。在信息确认无误后开始进行初始化。在初始化的最后阶段,系统会给用户分配一个初始化的临时密码,大家一定要保存好,例如下面示例中分配的密码是 PhwfpNq:u8ot
[root@centos8_1 mysql]# chown -R mysql:mysql /usr/local/mysql/
[root@centos8_1 mysql]# cd bin
[root@centos8_1 bin]# ./mysqld --initialize --user=mysql --basedir=/usr/local/mysql --datadir=/usr/local/mysql/data

与Nginx服务相似,MySQL数据库的二进制可执行命令也单独存放在自身的程序目录/usr/local/mysql/bin中。若每次在执行命令之前都要先切换到这个目录,则着实有些麻烦,这里我们也把它添加到环境变量中
[root@centos8_1 bin]# vim ~/.bash_profile
# .bash_profile

# Get the aliases and functions
if [ -f ~/.bashrc ]; then
        . ~/.bashrc
fi

# User specific environment and startup programs

PATH=$PATH:$HOME/bin:/usr/local/nginx/sbin:/usr/local/mysql/bin

export PATH

[root@centos8_1 bin]# source ~/.bash_profile
在这样设置后,即便返回到源码目录,也可以继续执行MySQL数据库的管理命令。不过先别着急!既然是手动安装服务,那么让文件“归位”的重任就只得亲力亲为了,将启动脚本mysql.server放入到/etc/init.d目录中,让服务器每次重启后都能自动启动数据库,并给予可执行权限。
libtinfo.so.5文件是MySQL数据库在8.0版本后新添加的重要的函数库文件,但默认不存在,需要将libtinfo.so.6.1文件复制过来或者作为链接文件才能正常启动:
[root@centos8_1 bin]# cd /usr/local/mysql/
[root@centos8_1 mysql]# cp -a support-files/mysql.server /etc/init.d/
[root@centos8_1 mysql]# chmod a+x /etc/init.d/mysql.server
[root@centos8_1 mysql]# ln -s /usr/lib64/libtinfo.so.6.1 /usr/lib64/libtinfo.so.5执行MySQL数据库服务启动文件,并进行初始化工作。为了安全着想,MySQL自8.0版本起不再允许用户使用临时密码来管理数据库内容,也不能进行远程控制,用户必须修改初始化密码后才能使用MySQL数据库。数据库作为系统重要的组成服务,密码位数不建议少于20位。例如,下面将密码修改为“PObejCBeDzTRCncXwgBy”。下面的连接密码,就是上面mysql初始化的原始密码。
[root@centos8_1 mysql]# /etc/init.d/mysql.server start
Starting MySQL.Logging to '/usr/local/mysql/data/centos8_1.err'.
.. SUCCESS!
[root@centos8_1 mysql]# mysql -u root -p
Enter password:
Welcome to the MySQL monitor.  Commands end with ; or \g.
Your MySQL connection id is 8
Server version: 8.0.33

Copyright (c) 2000, 2023, Oracle and/or its affiliates.

Oracle is a registered trademark of Oracle Corporation and/or its
affiliates. Other names may be trademarks of their respective
owners.

Type 'help;' or '\h' for help. Type '\c' to clear the current input statement.

mysql> ALTER USER 'root'@'localhost' IDENTIFIED WITH mysql_native_password BY 'PObejCBeDzTRCncXwgBy';
安装配置PHP服务
添加www用户,对于php来说,我们需要在系统中创建一个名为www的用户,专门用于负责运行php。请记得要把这类账户的Bash终端设置成nologin解释器,避免黑客通过该用户登录到服务器中,从而提高系统安全性。
[root@centos8_1 php-7.4.33]# useradd www -M -s /sbin/nologin编译php7的时候需要先建立一个lib库,否则编译的时候会报错 configure: error: Cannot find ldap libraries in /usr/lib.
[root@centos8_1 php-7.4.33]# cp -frp /usr/lib64/libldap* /usr/lib/解压php安装包软件并编译安装。在编译期间,需要使用prefix参数指定安装路径,使用--with-mysqli等参数开启对数据库支持的模块列表
[root@centos8_1 mysql]# cd /lnmp
[root@centos8_1 lnmp]# tar zxvf php-7.4.33.tar.gz
[root@centos8_1 lnmp]# cd php-7.4.33
[root@centos8_1 php-7.4.33]# ./configure --prefix=/usr/local/php7.4 --with-config-file-path=/usr/local/php7.4/etc --enable-fpm --with-fpm-user=www --with-fpm-group=www --enable-mysqlnd --with-mysqli=mysqlnd --with-pdo-mysql=mysqlnd --enable-mysqlnd-compression-support --with-iconv-dir --with-zlib --enable-xml --disable-rpath --enable-bcmath --enable-shmop --enable-sysvsem --enable-inline-optimization --with-curl --enable-mbregex --enable-mbstring --enable-intl --enable-ftp --with-gd --with-openssl --with-mhash --enable-pcntl --enable-sockets --with-xmlrpc --enable-soap --with-gettext --disable-fileinfo --enable-opcache --with-pear --enable-maintainer-zts --with-ldap=shared --without-gdbm
编译时发现有个软件包报错
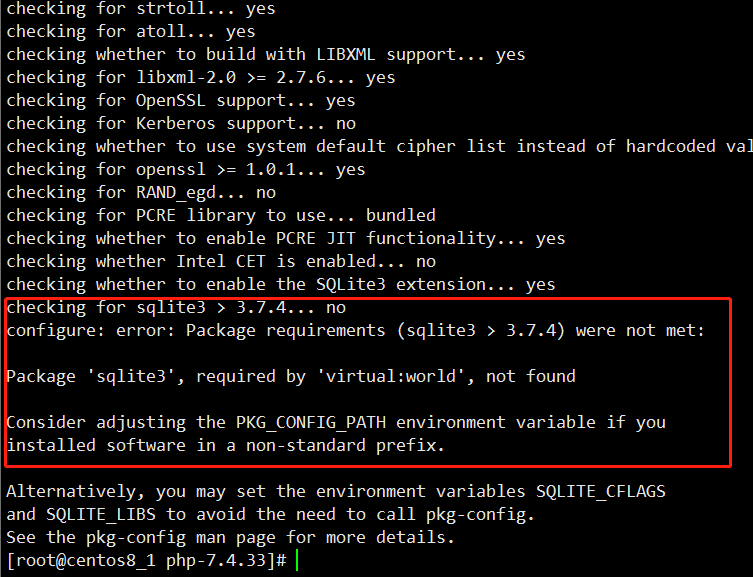
这里我们安装下这个sqlite-devel
[root@centos8_1 php-7.4.33]# yum install sqlite-devel编译过程中又发现一个报错 *Package 'oniguruma', required by 'virtual:world', not found
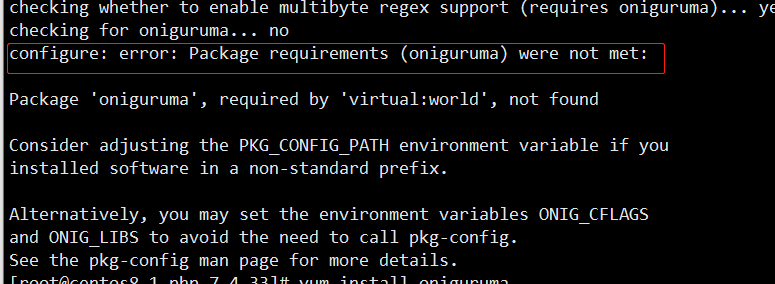
先去github下载,然后解压安装
[root@centos8_1 php-7.4.33]# cd /lnmp/
[root@centos8_1 lnmp]# wget https://github.com/kkos/oniguruma/archive/v6.9.4.tar.gz -O oniguruma-6.9.4.tar.gz
[root@centos8_1 lnmp]# tar zxvf oniguruma-6.9.4.tar.gz
[root@centos8_1 lnmp]# cd oniguruma-6.9.4/
[root@centos8_1 oniguruma-6.9.4]# ./autogen.sh && ./configure --prefix=/usr
[root@centos8_1 oniguruma-6.9.4]# make && make install
再试试编译php
[root@centos8_1 oniguruma-6.9.4]# cd /lnmp/php-7.4.33/
[root@centos8_1 php-7.4.33]# ./configure --prefix=/usr/local/php7.4 --with-config-file-path=/usr/local/php7.4/etc --enable-fpm --with-fpm-user=www --with-fpm-group=www --enable-mysqlnd --with-mysqli=mysqlnd --with-pdo-mysql=mysqlnd --enable-mysqlnd-compression-support --with-iconv-dir --with-zlib --enable-xml --disable-rpath --enable-bcmath --enable-shmop --enable-sysvsem --enable-inline-optimization --with-curl --enable-mbregex --enable-mbstring --enable-intl --enable-ftp --with-gd --with-openssl --with-mhash --enable-pcntl --enable-sockets --with-xmlrpc --enable-soap --with-gettext --disable-fileinfo --enable-opcache --with-pear --enable-maintainer-zts --with-ldap=shared --without-gdbm
这次发现没有报错了
直接执行,使用下述命令生成二进制文件并进行安装,时间大约为10~20分钟,耐心等待即可:
[root@centos8_1 php-7.4.33]# make && make install将生成的php服务配置文件复制到安装目录中(/usr/local/php7.4/),让其生效。
[root@centos8_1 php-7.4.33]# cp php.ini-development /usr/local/php7.4/etc/php.ini
[root@centos8_1 php7.4]# cd /usr/local/php7.4/etc/
现在主配置文件有了,接下来还需要php-fpm的配置文件,好在/usr/local/php/etc/目录中也已经提供,只需要复制模板即可:
[root@centos8_1 etc]# cp php-fpm.conf.default php-fpm.conf复制一个模板文件到php-fpm.d的目录中,用于后续控制网站的连接性能:
[root@centos8_1 etc]# mv php-fpm.d/www.conf.default php-fpm.d/www.con把php服务加入到启动项中,使其重启后依然生效:
[root@centos8_1 etc]# cd /lnmp/php-7.4.33/
[root@centos8_1 php-7.4.33]# cp sapi/fpm/init.d.php-fpm /etc/init.d/php-fpm7.4
[root@centos8_1 php-7.4.33]# chmod 755 /etc/init.d/php-fpm7.4
由于php服务程序的配置参数会对Web服务的运行环境造成影响,如果默认开启了一些不必要且高危的功能(如允许用户在网页中执行Linux命令),则会降低网站被入侵的难度,甚至会让入侵人员拿到整台Web服务器的管理权限。因此需要编辑php.ini配置文件,在第312行的disable_functions参数后面追加上要禁止的功能。下面的禁用功能名单是刘遄老师依据本书配套站点的运行经验而定制的,不见得适合每个生产环境,建议大家在此基础上根据自身工作需求酌情删减:
[root@centos8_1 php-7.4.33]# vim /usr/local/php7.4/etc/php.ini
309 ; This directive allows you to disable certain functions.
310 ; It receives a comma-delimited list of function names.
311 ; http://php.net/disable-functions
312 disable_functions = passthru,exec,system,chroot,chgrp,chown,shell_exec,proc_open,proc_get_status,popen,ini_alter,ini_restore,     dl,openlog,syslog,readlink,symlink,popepassthru,stream_socket_server
启动PHP
[root@centos8_1 php-7.4.33]# /etc/init.d/php-fpm7.4 start
各软件systemctl添加服务并且自启动方法
php
在/etc/systemd/system 新建文件:php-fpm.service内容入下,内容的文件路径请换成自己环境下的
[Unit]
Description=PHP 7.4 FastCGI Process Manager
After=network.target

[Service]
Type=simple
PIDFile=/usr/local/php7.4/var/run/php-fpm.pid  # 需与 php-fpm.conf 中的 pid 设置一致
ExecStart=/usr/local/php7.4/sbin/php-fpm --nodaemonize --fpm-config /usr/local/php7.4/etc/php-fpm.conf
ExecReload=/bin/kill -USR2 $MAINPID  # 优雅重载配置
PrivateTmp=true

[Install]
WantedBy=multi-user.target
设置开机自动启动
在终端输入:systemctl enable php-fpm
开机自启动mysql服务
复制服务脚本
[root@localhost mysql-5.7.34]# cp /usr/local/mysql/support-files/mysql.server /etc/init.d/mysqld
添加此服务到系统服务
[root@localhost mysql-5.7.34]# chkconfig --add mysqld
添加服务后,就可以使用systemctl命令进行管理了
启动服务
[root@localhost mysql-5.7.34]# systemctl start mysqld
设置服务为开机自启动
[root@localhost mysql-5.7.34]# systemctl enable mysqld
查看服务运行状态
[root@localhost mysql-5.7.34]# systemctl status mysqld
添加nginx
终端运行:vim /usr/lib/systemd/system/nginx.service
文件内容:
[Unit]
Description=nginx service
After=network.target

[Service]
Type=forking
PIDFile=/usr/local/nginx/logs/nginx.pid  # 必须与 nginx.conf 中的 pid 路径一致
ExecStart=/usr/local/nginx/sbin/nginx    # Nginx 启动路径
ExecReload=/usr/local/nginx/sbin/nginx -s reload
ExecStop=/usr/local/nginx/sbin/nginx -s stop
PrivateTmp=true

[Install]
WantedBy=multi-user.target
添加完毕后可用下面命令管理
sudo systemctl daemon-reload            # 加载新服务配置
sudo systemctl start nginx              # 启动服务
sudo systemctl enable nginx             # 设置开机自启
sudo systemctl status nginx             # 验证状态
版权属于:
Dcr163的博客
本文链接:
http://dcr163.cn/748.html(转载时请注明本文出处及文章链接)
相关推荐


